
How to Enable Website Feedback Drupal Module?
The Website Feedback module is an essential tool for site owners, developers, and QA teams to collect feedback directly within the site context. While working on or maintaining a website, developers and content editors often overlook subtle visual bugs or usability issues. With this module, users and testers can report issues immediately along with an annotated screenshot and a description. Submissions are saved as Drupal content entities, allowing administrators to review, categorize, and resolve them efficiently. The module is fully compatible with Drupal 10.3 and Drupal 11 .
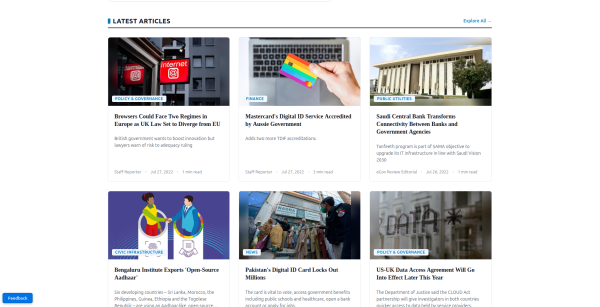
Steps to Install and Enable the Website Feedback Module
- Install via Composer: Run the following command in your terminal:
composer require 'drupal/website_feedback:^1.2' - Enable the Module: Enable it from the Extend page (
/admin/modules) or using Drush:drush en website_feedback -y - Configure User Permissions: Navigate to Administration > People > Permissions (
/admin/people/permissions) and grant the Create website feedback permission to the appropriate roles (e.g., Anonymous user, Authenticated user, or QA Tester). Grant View , Edit and Delete website feedback to the roles that will manage submissions. - Verify the Trigger Button: Once enabled and permissions are granted, a floating Feedback button will appear on the front end (bottom-left by default, customizable in settings).
Submitting Feedback via the Modal Form
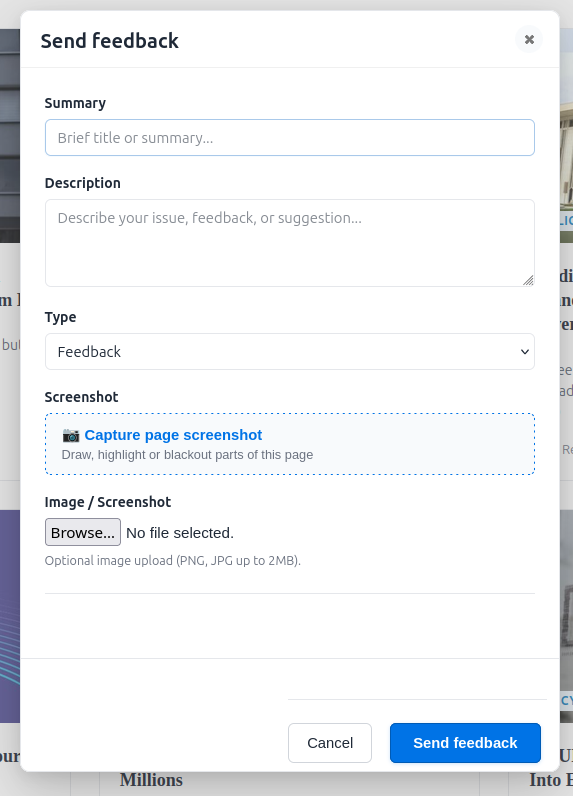
Clicking the floating feedback button opens a responsive modal dialog containing the following fields:
1. Summary: A brief title or overview of the feedback.
2. Description: Specific details, steps to reproduce, or suggestions.
3. Type of Feedback: Categorize the submission as Feedback , Support request , or Bug report .
4. Screenshot of the Page: The built-in screenshot tool captures the visible page and provides interactive annotation tools:
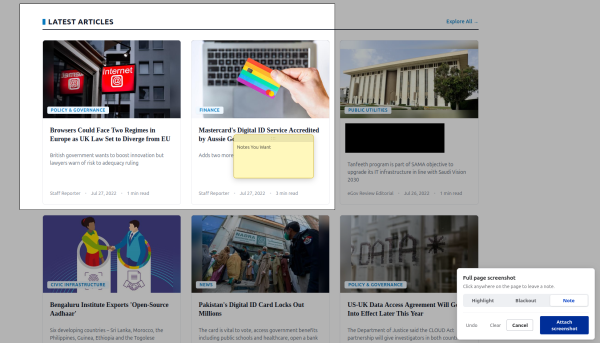
- Highlight: Draws a colored box around the specific area you want to call attention to.
- Blackout: Masks sensitive information (e.g., passwords, private data) before saving.
- Add a note: Adds a numbered comment pin directly on the screenshot.
5. Additional Image Upload: Attach an existing image or mobile photo directly from your device.
6. Feedback Tags (Optional): If enabled by an administrator, users can tag submissions using terms from a selected taxonomy vocabulary.
Managing and Resolving Feedback in the Admin Dashboard
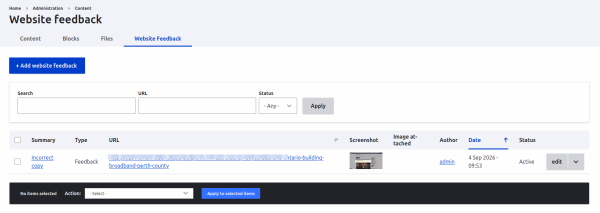
All submissions are saved as Drupal entities and displayed on the administrative dashboard at Administration > Content > Website Feedback ( /admin/content/website-feedback ).
- Summary Metric Cards: View real-time totals for Active and Resolved items.
- Status Badges: Easily distinguish between Open and Resolved feedback.
- Thumbnail Previews: Instantly view screenshots and uploaded images directly in the listing table.
- Quick Actions: Mark items as resolved or re-open them with a single click.
- Detail View: Click any feedback title to inspect submission metadata, including user details, submission timestamp, and the exact target page URL.
Customizing and Theming in Your Site's Theme
The Website Feedback module is designed to integrate cleanly with any Drupal theme (such as Olivero, Claro, or custom Tailwind/Bootstrap themes). You can customize its appearance in four simple ways:
Method 1: Using CSS Custom Properties (Recommended)
The floating button and modal use CSS custom properties prefixed with --wf-* . You can match the module to your brand colors simply by declaring these variables in your theme’s main stylesheet:
html:root {
      /* Match the button and accent colors to your brand */
      --wf-primary: #c1121f;
      --wf-primary-hover: #9d0208;
      --wf-radius: 8px;
    }
Declare these on html:root rather than :root . It outranks the module's own declaration on specificity, so it applies regardless of stylesheet order.
Further properties are available for text, backgrounds, borders, radii, shadow and validation colors. See the :root block at the top of css/website-feedback-theme.css for the current list.
The feedback button uses white text, so choose a color with a contrast ratio of at least 4.5:1 against white to meet WCAG 2.2 AA. The module default #0073e6 measures 4.57:1.
Method 2: Custom CSS Overrides
To make deeper structural or styling changes (such as custom padding, typography, or shadows), target the module's classes directly in your theme:
/* Floating button. Which wrapper class is used depends on the Link Position
   setting, and bottom-left is the default, so target both. */
.website-feedback-toggle-wrapper .button-website-feedback,
.website-feedback-toggle-wrapper-left .button-website-feedback {
  font-family: 'Poppins', sans-serif;
  text-transform: uppercase;
  letter-spacing: 0.5px;
}

/* Modal form container */
.ui-dialog .website-feedback-form {
  padding: 1.5rem;
}

/* Screenshot annotation toolbar */
.website-feedback-controls {
  border-radius: 12px;
  box-shadow: 0 10px 30px rgba(0, 0, 0, 0.15);
}
The example above works because the module sets no font rules on the button. To change properties the module does set, such as background, padding or border radius, use the --wf-* properties from Method 1, or match the module's own specificity with a#website-feedback-button.button.button-website-feedback .
Method 3: Overriding via libraries-override
If your theme needs to completely replace the module's stylesheets with your own compiled CSS, use libraries-override in your theme’s THEMENAME.info. yml :
libraries-override:
  website_feedback/website_feedback:
    css:
      component:
        css/website-feedback.css: css/custom-website-feedback.css
The module ships three stylesheet libraries. The group key in your override must match the library's own group:
website_feedback— floating button, groupcomponentwebsite_feedback_theme— modal and dashboard styling, groupthemescreenshot— annotation tools, groupcomponent
Two further libraries, html2canvas and html2canvas-cdn, load the screenshot capture library and contain no CSS.
Method 4: Overriding the Twig Template
If you want to restructure the HTML markup, reorder sections, or add custom branding containers to the feedback detail page, copy the template into your theme:
- Copy from module:
modules/contrib/website_feedback/templates/website-feedback.html.twig - Paste into your theme:
themes/custom/YOUR_THEME/templates/website-feedback.html.twig - Clear the Drupal cache:
drush cr
Inside your custom template, you have direct access to {{ content }} (renderable fields), {{ website_feedback }} (the entity object), {{ type_label }} and {{ attributes }} .
Configuring Module Settings
Administrators can customize module behavior at Administration > Configuration > Development > Website Feedback ( /admin/config/development/website-feedback ):
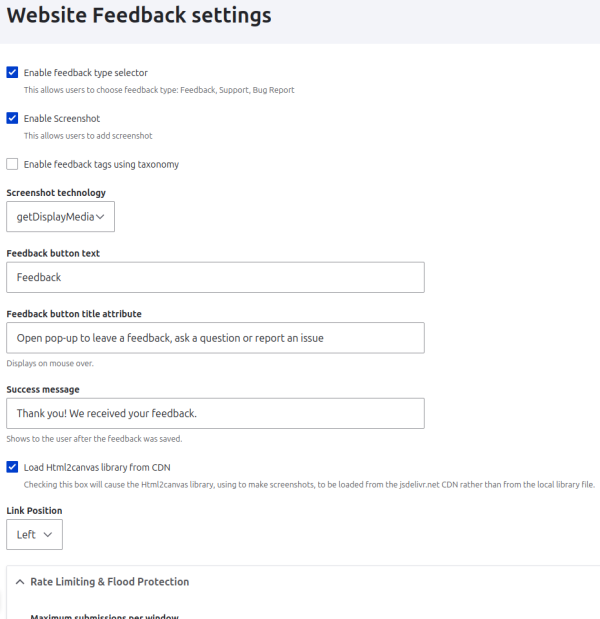
- Floating Button Position: Place the button on the bottom-left or bottom-right corner.
- Screenshot Technology: Choose between client-side rendering (
html2canvas) or the native browser Screen Capture API (getDisplayMedia). - Submission Flood Control: Configure rate limits (submissions per hour) to protect against automated spam.
- Taxonomy Integration: Enable custom tags and select the taxonomy vocabulary used for categorizing feedback.
Website Feedback Module on Drupal.org | Maintained and sponsored by Zyxware Technologies .
Zyxware is a leading Drupal development company with a team of high expertise in Drupal custom module development services since 2006.